Have you ever wondered how manufacturers create high-quality plastic parts quickly without breaking the bank on expensive tooling? Vacuum casting might be the answer you’re looking for. This versatile manufacturing process bridges the gap between prototyping and full-scale production, allowing engineers and designers to produce small batches of detailed components efficiently. In this comprehensive guide, we’ll dive into what vacuum casting is, how it works, its key advantages, and where it shines in real-world applications.
Whether you’re a product developer testing new designs or a business owner seeking affordable low-volume production options, understanding vacuum casting can transform your approach to manufacturing. Let’s explore this technique step by step.
What is Vacuum Casting?
Vacuum casting, also known as urethane casting or polyurethane casting, is a manufacturing method that uses a vacuum to draw liquid material into a silicone mold. It replicates plastic or rubber parts with high fidelity, making it ideal for prototypes and short production runs. The process starts with a master pattern, typically created via 3D printing or CNC machining, and involves pouring resin into a mold under vacuum conditions to eliminate air bubbles and ensure precise details.
Unlike traditional casting methods, vacuum casting excels in producing parts that mimic injection-molded quality without the high costs. It’s particularly useful for creating functional prototypes that need to withstand testing or even serve as end-use parts in limited quantities. For instance, imagine crafting a custom phone case with soft grips – vacuum casting handles such complexities with ease.
The history of vacuum casting traces back to the need for rapid prototyping in industries like automotive and consumer electronics. Today, it’s a go-to for companies aiming to iterate designs quickly while keeping expenses low.
How Does Vacuum Casting Work?
The vacuum casting process is straightforward yet precise, involving several key steps to achieve high-quality results. It typically takes just a few days from design to finished parts, depending on complexity.
Step 1: Create the Master Pattern
Everything begins with a 3D model. Designers use CAD software to create a digital blueprint, then produce a physical master pattern using technologies like SLA 3D printing or CNC machining. This master must be flawless, as any imperfections will transfer to the final casts. For example, if you’re prototyping a medical device housing, the master pattern ensures smooth surfaces and accurate dimensions.
Pro tip: Polish the master to achieve the desired finish – glossy, matte, or textured – since the mold will replicate it exactly.
Step 2: Produce the Silicone Mold
Once the master is ready, it’s suspended in a casting box. Silicone rubber is mixed, degassed, and poured around the pattern. The setup cures in an oven, forming a flexible mold. After curing, the mold is split, and the master is removed, leaving a cavity perfect for casting.
Silicone molds are durable enough for 10 to 30 casts, depending on the resin and part geometry. This reusability keeps costs down compared to metal molds used in injection molding.
Step 3: Prepare and Pour the Resin
Resins, often polyurethanes, are mixed with pigments or additives for color and properties. The mold is placed in a vacuum chamber, where air is removed to prevent bubbles. The liquid resin is then poured in, filling every nook under vacuum pressure.
This step is crucial for avoiding voids and ensuring uniform material distribution. In advanced setups, automated mixing degasses the resin for 50-60 seconds before pouring.
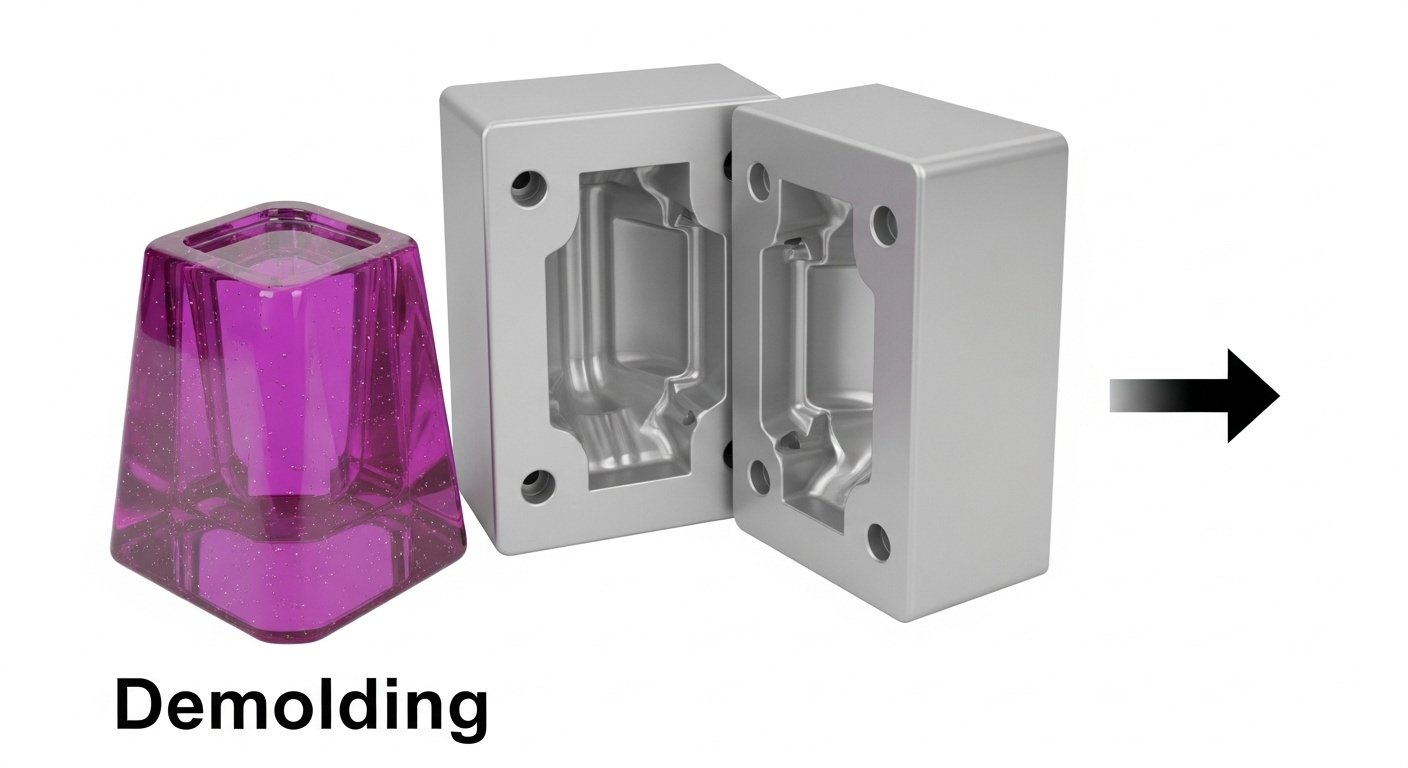
Step 4: Cure and Demold
The filled mold cures in an oven for 1-4 hours. Once hardened, the part is demolded, trimmed of excess material like gates and risers, and finished with painting or polishing if needed.
Repeat the process for additional parts until the mold wears out. This cycle allows for rapid production of identical components.
Materials Used in Vacuum Casting
Material selection is key to vacuum casting’s versatility. The right choices can simulate everything from rigid plastics to flexible rubbers.
Mold Materials
Silicone is the standard for molds due to its flexibility, heat resistance, and detail reproduction. High-quality silicones withstand multiple casts and maintain accuracy.
Casting Resins
Polyurethane resins dominate, offering properties like transparency, impact resistance, and chemical durability. Common options include:
- ABS-like resins for tough, durable parts.
- PC-like materials (e.g., PX510) for clarity and machinability.
- Elastomers for soft, rubbery components.
- Glass-filled nylons for enhanced strength in high-load applications.
Specialty resins like UP5690 provide remarkable impact strength, ideal for demanding uses. Always match the resin to your project’s needs – for example, use flame-retardant options for electronics.
Applications of Vacuum Casting
Vacuum casting finds its place across various industries, thanks to its speed and quality.
In automotive, it’s used for prototyping dashboards or light covers. Consumer products benefit from it for creating phone cases or kitchen gadgets with fine details. Medical devices, like custom prosthetics or housings, leverage its precision.
It’s perfect for low-volume production, such as 10-100 units for market testing or limited editions. Case studies show companies like Louisville Slugger using it for sports equipment prototypes, or SiOCAST for miniature figures.
For internal linking, consider related topics like “Rapid Prototyping Techniques” or “Choosing Between 3D Printing and Casting.”
Advantages of Vacuum Casting
Why choose vacuum casting over other methods? Here are the standout benefits:
- High Precision and Fine Detail: Achieves tolerances of ±0.05 mm, replicating intricate features flawlessly.
- Cost-Effective for Small Batches: Low tooling costs make it cheaper than injection molding for runs under 100 parts.
- Fast Turnaround: From design to parts in days, ideal for tight deadlines.
- Material Versatility: Simulates production materials, including overmolding for multi-material parts.
- Excellent Surface Finishes: Options like spray painting, electroplating, or polishing for professional looks.
These perks make it a favorite for prototyping and bridging to full production.
Disadvantages and Limitations
No process is perfect. Vacuum casting’s drawbacks include:
- Limited to small production volumes; molds degrade after 20-30 uses.
- Material restrictions – mainly polyurethanes, not true thermoplastics.
- Potential shrinkage (0.15-0.25%) affecting dimensions.
- Not suitable for very large parts due to mold size limits.
Understanding these helps decide if it’s right for your project.
Vacuum Casting vs. Injection Molding
Vacuum casting simulates injection molding but at lower costs for small runs. Injection molding excels in high volumes with metal tools, offering broader material choices but higher upfront expenses. Vacuum casting wins for prototypes, while injection takes over for mass production.
| Aspect | Vacuum Casting | Injection Molding |
|---|---|---|
| Volume | Low (10-100) | High (1000+) |
| Cost | Low tooling | High tooling |
| Lead Time | Days | Weeks |
| Materials | Limited resins | Wide thermoplastics |
Vacuum Casting vs. 3D Printing
3D printing is great for one-offs and complex geometries, but vacuum casting provides better surface finishes and material properties for multiples. Use 3D printing for masters, then switch to casting for batches.
| Aspect | Vacuum Casting | 3D Printing |
|---|---|---|
| Speed for Multiples | Faster | Slower |
| Finish | Smooth | Layered |
| Cost per Part | Lower for 10+ | Consistent |
| Durability | Higher | Varies |
Technical Specifications and Design Considerations
Typical tolerances: ±0.3% or ±0.05 mm. Part sizes up to 2 meters, but smaller is common. Design for uniform walls (1-4 mm) to avoid sinks, and include draft angles for easy demolding.
For engagement, ask: What’s the largest challenge in your prototyping process?
In conclusion, vacuum casting stands out as a reliable, efficient method for producing high-quality parts without massive investments. Whether for testing ideas or launching small products, it offers a balance of speed, cost, and quality. If you’re ready to prototype, consider partnering with services like Xometry or Formlabs for expert results. Explore related articles on “Injection Molding Basics” or “3D Printing for Prototypes” for deeper insights.
Explore More Topic: Tubidy
FAQ
What is the typical lead time for vacuum casting projects?
Vacuum casting projects can be completed in as little as a few days, from master pattern creation to final parts, making it ideal for rapid prototyping.
Can vacuum casting produce parts with multiple materials?
Yes, techniques like overmolding allow combining rigid and flexible materials in one part, such as adding soft grips to a hard plastic base.
How many parts can one silicone mold produce?
A single silicone mold typically yields 10 to 30 parts, depending on the complexity, resin type, and part geometry.
Is vacuum casting environmentally friendly?
Vacuum casting uses recyclable materials and reusable molds, reducing waste compared to some other processes, though resin disposal requires care.